History
Sometime late in the 1990's, (it might have been a bit earlier) a friend of mine sparked an old interest of mine when his son became interested in blacksmithing. He bought an anvil and a rivet forge and set it up for them to use together.
I built a brake drum forge and played a bit, but didn't really have time for a blacksmith hobby until after I retired in 2003.
In early 2004, I discovered blacksmith conferences and tailgating. This opened an avenue to buy real blacksmith equipment.
I bought a real fire pot and built a more conventional coal forge.... Then I bought a post vise and even built a treadle hammer.
Within a year or so, I had a Little Giant power hammer. My later experiences with power hammers is another story.....
I loved working with coal. Unfortunately for my hobby, I live in an urban area with close neighbors, so I was always a little concerned about the smoke and odors I was putting out.
Somewhere in that timeframe, I learned about gas forges. I built two gas forges, but primarily used coal the first couple years.
I finally started using propane more than coal and learned a few lessons (the hard way) about forge construction.
Then I kind of went on a quest to build the perfect gas forge. Pictures on the right (Earlier) show a succession of forges I made over the years (they are coming if not there yet).
I finally settled on the Super C design, which I initially fabricated using a cylinder for the forge body.
Later, I started using a C channel for the bottom.
Somewhere in there, I also made several square bodied C forges using square tubing, then C channel for both the bottom and top of the forge.
Early on, I was building Ron Reil type burners. Later, at Quad States, I saw a slightly different version of the burner I make now, simplified building it, and made the burner video.
After I started making YouTube videos, I was trying to build a "quiet" forge so its noise didn't interfere with my talking during video taping. This led me to trying ribbon burners.
Ribbon burners are quieter than atmospheric burners, but they require a blower that is noisy.
Part of my goal was to design a low cost forge I could teach others to build.
I did find a small atmospheric ribbon burner that was reasonably quiet, but it required a commercial venturi pipe (which made the setup expensive).
I eventually learned how to do "voice overs" on my videos, so I no longer needed a quiet forge.
I finally abandoned all forge design efforts except the Super C, then produced the Super C and propane burner videos.
Since the Super C forge is small (which is all that is needed for almost ALL hobby blacksmiths), I designed the Free Form forge using Insulating Fire Brick (IFB) and a burner manifold for it.
The rest is history....
The Super C forge videos were posted several years ago. They document the process of using a cylinder for the entire forge body...
Design and Build Process Updates...
The pictures and comments below show design and process changes that have been made to the Super C since the videos were produced.
I recommend you watch all the videos, then review the changes made to the design and processes below....
Click on the pictures for a larger view.... Close the window when done viewing.
Forge Body Changes
The primary update to the videos is to use a "C" channel for the bottom of the forge. This change provides a larger floor area and a simpler lining process.
The photos below show a C channel being used for the bottom with a half cylinder being used for the top. If you want more burn chamber volume (full width to the top), you can use a C channel on the top also. Just be sure you accommodate the appropriate opening above the table (I like to make it 2 inches so I can lay down a brick for the door).

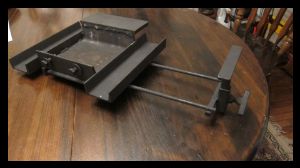
I used an 8 x 2 inch C channel for the base.
The lower door channels were welded even with the bottom.
The shelf was welded on the top of one side.
2 holes were drilled and tapped for 1/2" bolts to attach the top of the forge.
A shelf was welded on below the bolts to provide a stop when the top was attached.
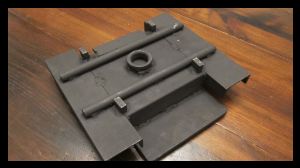
The bottom view shows the coupler (1/2 of one actually) welded in the center.
A pipe is screwed into this when the forge is placed on a pedestal.
The two pipes provide the sleeves for the pull-out support mechanism.
Four legs are welded on to enable the forge to sit on a bench.

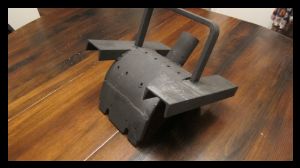
A heavy plate was welded onto one side of a half-cylinder.
That plate sits on the shelf below the bolts on the base (1st picture) and provides for a two inch opening above the shelf.
Slots area cut in the plate to allow for sliding the top on (over bolts and washers).
The burner holder is positioned as shown.
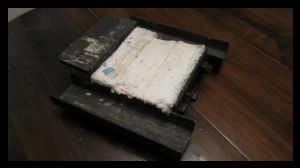
One inch of thermal blanket is placed in the C channel.


A floor is cast that fits into the C channel. The top of the floor should extend about a quarter inch above the shelf.
No refractory covering is used on the lower half of the forge.
The floor can easily be switched out.
Use rigidizer to seal any exposed thermal blanket.
If you wish, you could position the lower door channels to eliminate the exposed thermal blanket.
This shows the lining in the top.
The bottom of the backside of the thermal blanket needs to be about a quarter of an inch above the floor.
The floor extends UNDER the thermal blanket. A narrow piece of thermal blanket could be as a gasket near the forge body.
Additional Building the Forge Body Video Comments.
Drilling holes for the staples that hold the thermal blanket in place was always challenging. I was always breaking small drill bits. I finally realized those holes didn't need to be perfect. I started using my OXY/ACET to just blast small holes. Not as pretty, but just as effective and it took just a minute or two to make all of them.
The opening above the table on the side should be only about 2 inches. This is so you can lay down a soft brick for the door(s). Be sure to have the brick slide in over the floor and under the lining that overhangs the shelf.
I use a saw and/or farrier's rasp to shape the brick so it lays flat on the shelf, but slides over the floor and under the thermal blanket above at a close tolerance.
I've made one forge (with a C channel for both the bottom and top of the forge) that has a taller opening. I tried gluing two bricks together to get the height coverage I wanted, but they did not stay adhered together. I ended up sitting bricks up on the shelf to cover the opening. The problem with this is the door does not go in over the floor, nor under the thermal blanket. This results in flames coming out and hitting the steel body, which will eventually damage the forge because of scaling. The forward fix will be to decrease the opening when I need to reline the forge.
If you need a larger opening over the shelf... so be it... just be sure you make doors that work (loose stacking does work also).
Lining Video Changes and Lessons Learned
Heat Box.... I seldom use the heat boxes (cardboard box with electric heater) to cure each layer of the lining anymore.
When I made the videos, I was trying to move along in the most expeditious fashion.
These days, when I do repairs or build a new forge I'm seldom in a hurry. When it's time to wait on something drying or curing, I just store that item in a warm room for the time it takes to dry or cure.
Don't get me wrong.... The heat box idea is a great way to speed things up if you want to... I'm just not in that big of a hurry anymore.
Determining how far the lining comes down on the back side... This may seem obvious, but if... when you assemble the forge after the upper lining is done, the thermal blanket goes down too far, it will be damaged.
Build the forge body, put in the floor, then put the top on. Be sure there is enough thermal blanket under the floor for it to be a bit higher than the table. Be sure the floor is level with the base of the forge. Use a grease pencil to mark the height of the table.
Use a hack saw, file or zip disc to mark both sides where the floor is level with the back of the forge. When you remove the top and glue the thermal blanket to the inside of the forge body, let it be longer than needed. I generally use sodium silicate to glue the blanket in (even though I add staples later). I use a straight edge (pressing it down and using a knife to get a clean cut before the sodium silicate has dried). It should be cut so it's a quarter of an inch or so above the floor after all the layers have been applied.
It would be a good idea to use a thin strip of thermal blanket as a gasket near the forge body.
Applying Mortar... I now use "Green Patch" mortar and thin it (center layer) enough to brush it on. It should be thick enough to "not be easy to spread". It still needs to be about an eighth of an inch thick. Be sure you brush it up into the cavity the burner will be lowered into. Sometimes I will even put two coats on. Be sure you "condition" each previous layer with a 50/50 solution of Colloidal Silica/water before you apply a new layer of either slurry or mortar (it's important).
Hose Holders..... I've added hose holders so there is no sideways strain on the quick connects and to keep the hose away from the forge body.
Lining Supplies Video Comments... It's important to do diligent research when buying supplies. Especially if you are going to buy small quantities.
The best price for Insulating Fire Brick (IFB) can be found by calling suppliers that sell refractory to industry. The best case would be to find a local supplier to avoid shipping costs.